
Apr . 01, 2024 17:55 Back to list
Oil Pressure Gauge how to wire an oil pressure gauge Performance Analysis
Introduction
The oil pressure gauge is a critical instrumentation component in internal combustion engine systems, providing real-time monitoring of lubricant pressure. Accurate oil pressure indication is paramount for engine health, preventing catastrophic failure due to lubrication starvation. This guide details the proper procedures for wiring an oil pressure gauge, encompassing sensor types, wiring configurations, and common troubleshooting techniques. The industry chain positions the gauge within the broader engine management system, relying on a pressure transducer to convert mechanical pressure into an electrical signal, which is then displayed. Core performance is assessed by accuracy, response time, and long-term stability of the electrical signal, factors directly impacting the reliability of the entire engine monitoring system. A common pain point in the automotive and industrial sectors is improper grounding or voltage supply leading to inaccurate readings, or complete gauge failure, necessitating a thorough understanding of the wiring process.
Material Science & Manufacturing
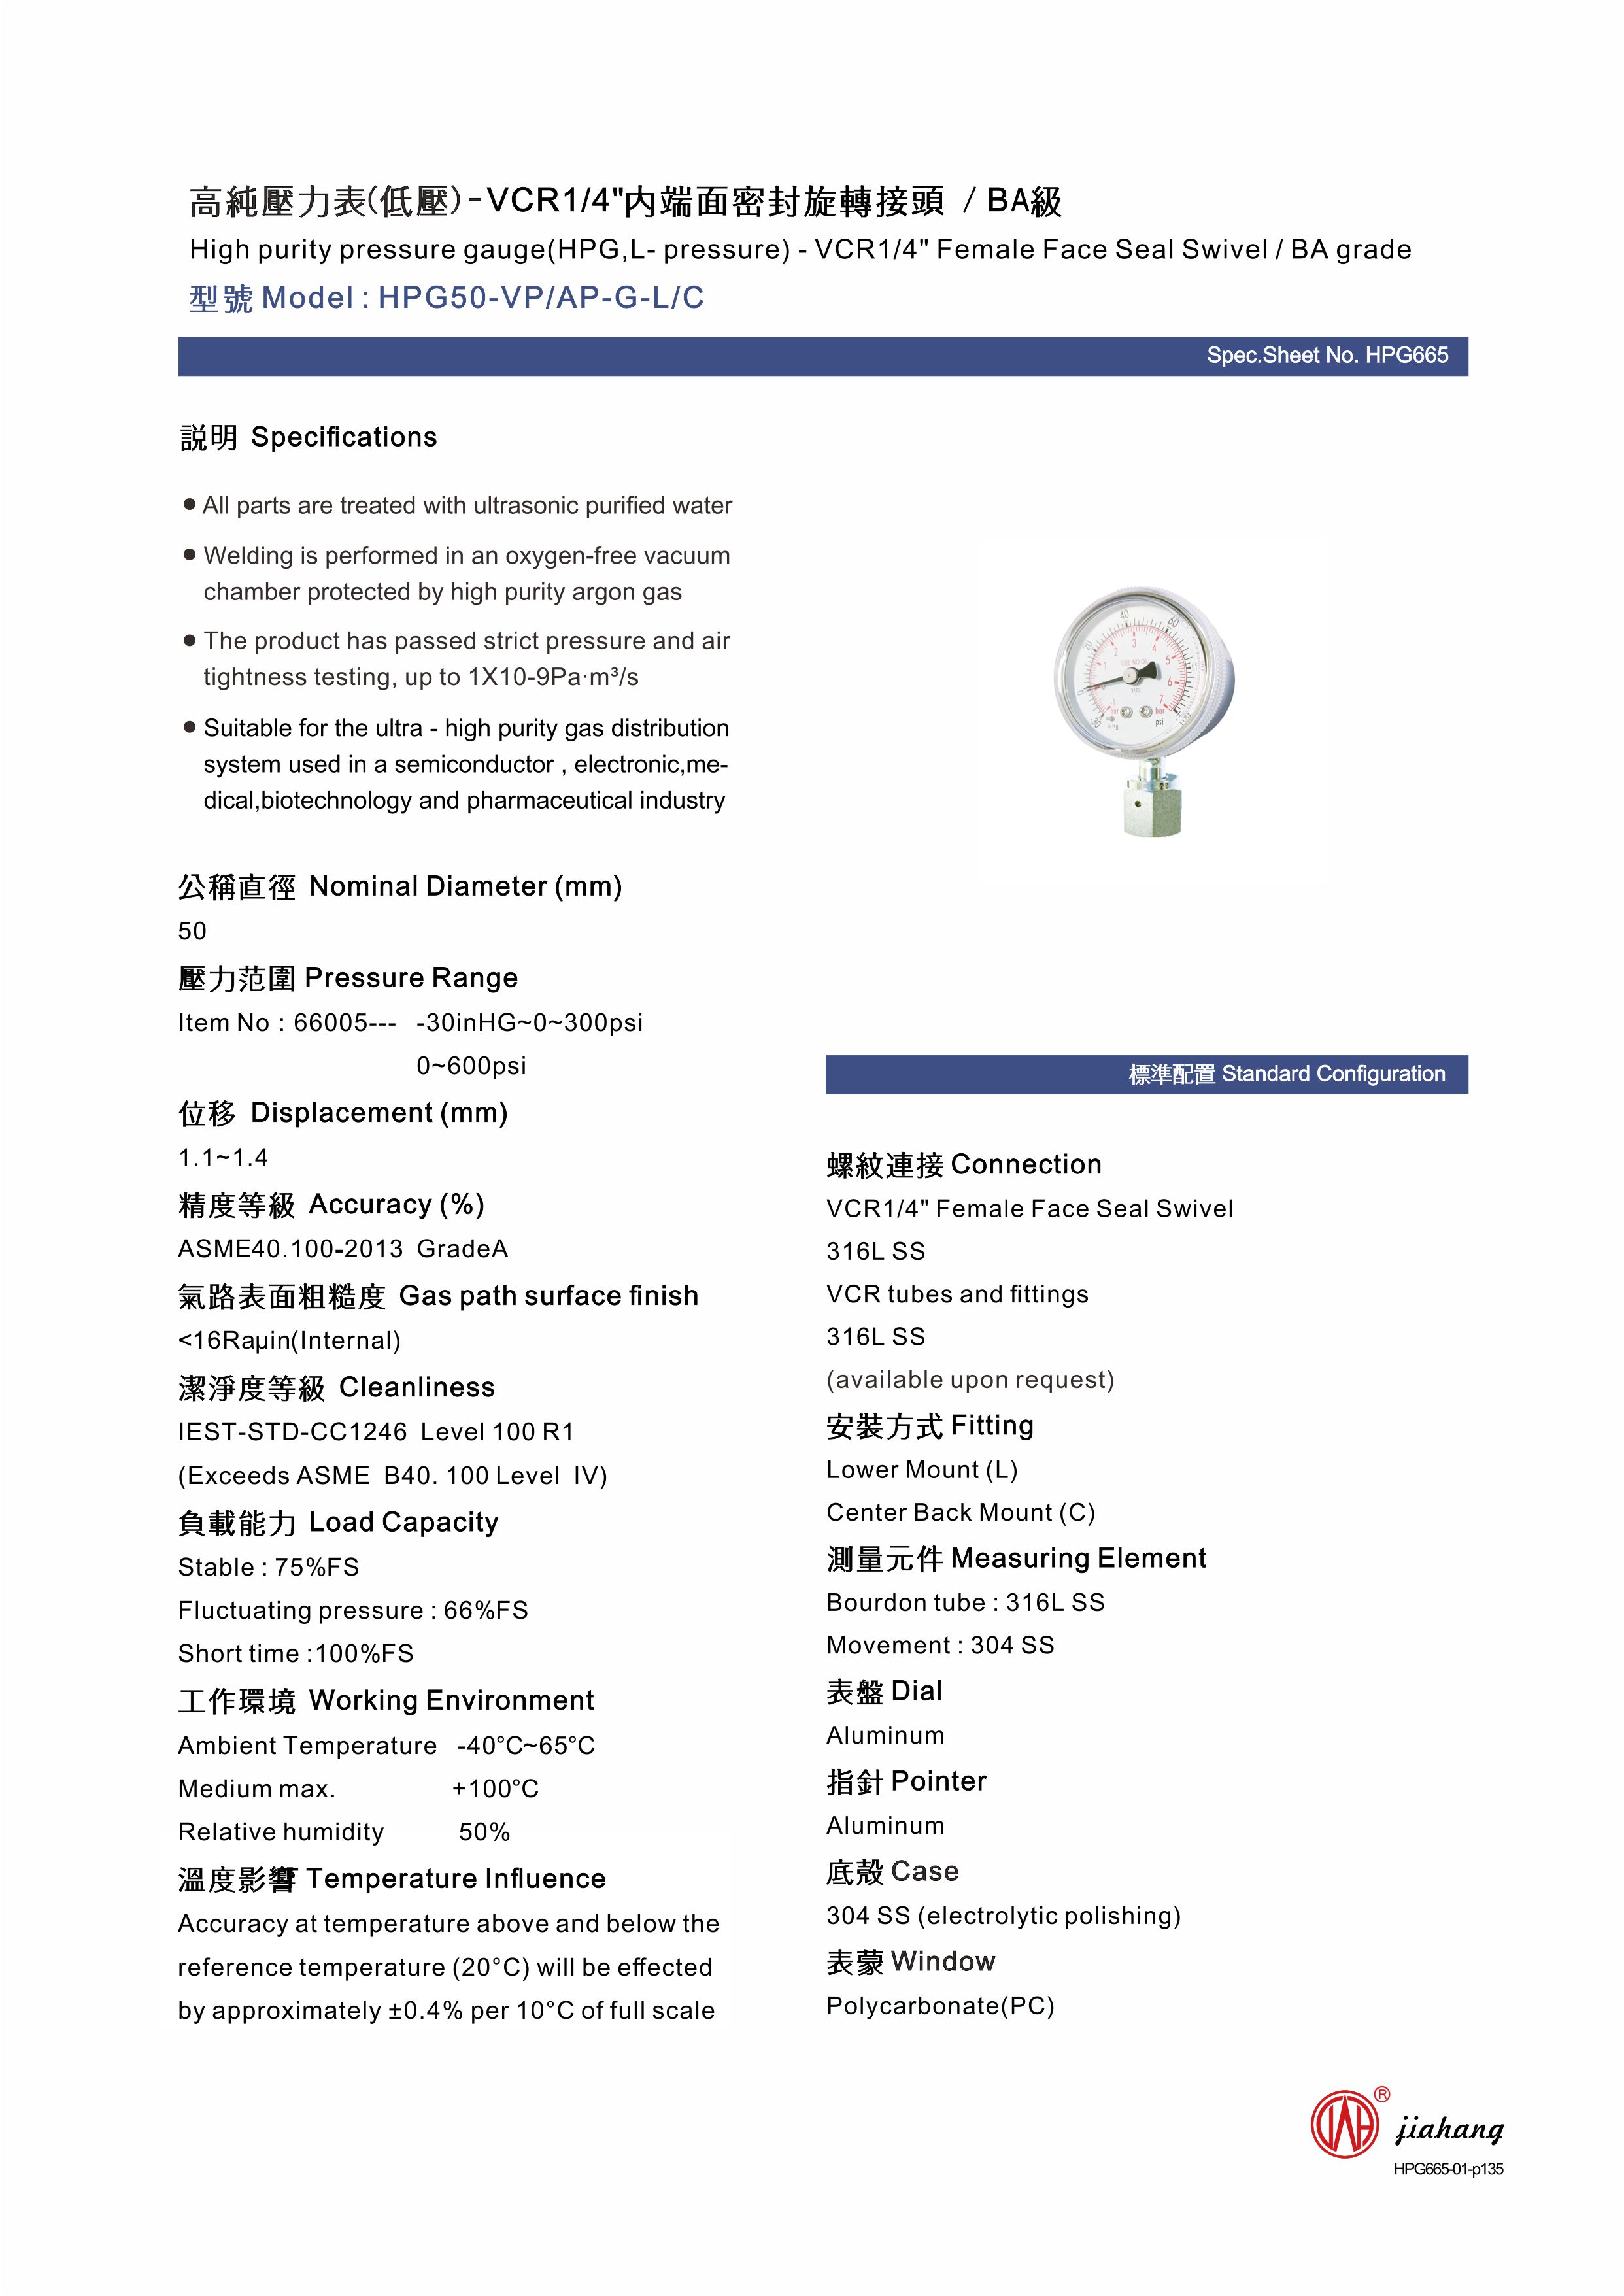
Oil pressure gauges utilize a variety of materials in their construction. The pressure transducer commonly employs a stainless steel diaphragm (typically 316 stainless steel for corrosion resistance in oil environments) coupled with a strain gauge, often a silicon-based piezoresistive sensor. The sensor housing is frequently constructed from aluminum alloy (6061-T6) for its strength-to-weight ratio and thermal conductivity. Wiring utilizes copper conductors, insulated with PVC or Teflon, chosen for their electrical properties and resistance to oil degradation. Manufacturing involves several key steps: diaphragm formation via deep drawing and annealing, strain gauge deposition using sputtering or thin-film techniques, and assembly via welding and epoxy bonding. Parameter control is critical – specifically, maintaining precise diaphragm thickness to ensure linearity of the pressure-to-voltage relationship, and ensuring strain gauge adhesion to prevent signal drift. The electrical connector, typically brass with gold plating for corrosion resistance, undergoes a rigorous quality control process to guarantee secure connections and prevent voltage drop. Failure to control material purity or adhere to tight tolerances during manufacturing can lead to premature sensor failure and inaccurate readings.
Performance & Engineering
Wiring an oil pressure gauge necessitates understanding basic electrical principles and safety protocols. The gauge requires a stable 12V or 24V DC power supply, with a dedicated ground connection to prevent interference. Signal transmission typically utilizes three wires: power, ground, and signal. Force analysis involves considering the pressure exerted by the oil on the diaphragm, and the resulting stress on the strain gauge. Environmental resistance is crucial; the gauge and wiring must withstand exposure to oil, fuel, and engine heat. Compliance requirements, such as those stipulated by SAE International (J1222 for oil pressure transducers), dictate acceptable accuracy and operating temperature ranges. Functional implementation requires a correctly wired gauge, a compatible sending unit with the appropriate pressure range (e.g., 0-100 PSI), and proper calibration. Proper shielding of the signal wire is critical to mitigate electromagnetic interference (EMI) from other engine components. The choice of wire gauge (typically 18-22 AWG) must be sufficient to handle the current draw without significant voltage drop. An incorrectly sized wire or loose connection can introduce resistance and lead to inaccurate readings or gauge malfunction.
Technical Specifications
| Parameter | Typical Value (Automotive Grade) | Typical Value (Industrial Grade) | Tolerance |
|---|---|---|---|
| Operating Voltage | 12V DC | 24V DC | ± 10% |
| Pressure Range | 0-100 PSI | 0-1000 PSI | ± 1% of Full Scale |
| Accuracy | ± 2% of Full Scale | ± 0.5% of Full Scale | Refer to calibration certificate |
| Operating Temperature | -40°C to +85°C | -50°C to +120°C | Per datasheet |
| Wiring Configuration | 3-Wire (Power, Ground, Signal) | 3-Wire (Power, Ground, Signal) / 4-Wire (Power, Ground, Signal, Analog Output) | Standardized connector type |
| Signal Output | 0-5V DC | 4-20mA | Linear output proportional to pressure |
Failure Mode & Maintenance
Common failure modes in oil pressure gauge wiring include: open circuits (broken wires), short circuits (wires touching each other or ground), corrosion at connectors, and loose connections. Fatigue cracking can occur in wires due to constant vibration. Delamination of insulation can expose conductors, creating short circuits. Degradation of PVC insulation due to prolonged exposure to high temperatures and oil can lead to brittle cracking. Oxidation of connectors creates high resistance. Maintenance involves regular visual inspection of wiring for damage, tightening of connections, and cleaning of connectors with contact cleaner. Applying dielectric grease to connections prevents corrosion. If the gauge consistently displays inaccurate readings, verify the power supply voltage, ground connection, and signal wire integrity. A multimeter can be used to test continuity and voltage levels. Periodically calibrate the gauge against a known pressure standard to ensure accuracy. Replacing corroded connectors or damaged wiring is essential for long-term reliability. Addressing oil leaks near the sensor and wiring harness will prevent oil-induced degradation.
Industry FAQ
Q: What is the difference between NPT and BSPT threads on the oil pressure sensor?
A: NPT (National Pipe Tapered) is a tapered thread standard commonly used in North America. BSPT (British Standard Pipe Tapered) is a tapered thread standard prevalent in Europe and Asia. They are not interchangeable. Using the wrong thread can result in leaks or damage to the engine. Always verify the thread type required by the engine and sensor before installation.
Q: How do I determine the correct pressure range for my oil pressure gauge?
A: The pressure range should be selected based on the engine's operating specifications. Consult the engine manufacturer's service manual for the recommended oil pressure range. Choosing a gauge with a range too low will result in the gauge maxing out during normal operation. A range too high will reduce accuracy, especially at lower pressures.
Q: What causes erratic or fluctuating oil pressure readings?
A: Erratic readings can be caused by several factors, including a faulty sending unit, loose wiring connections, electrical interference (EMI), a failing oil pump, or excessive oil aeration. Start by checking the wiring and connections. If those are sound, test the sending unit. If the issue persists, investigate the oil pump and oil quality.
Q: Is it necessary to use a resistor when wiring an aftermarket oil pressure gauge?
A: Some aftermarket gauges require a resistor in the sender circuit to properly interpret the signal. This is especially common with gauges designed for older vehicles. Consult the gauge manufacturer's instructions to determine if a resistor is needed and, if so, the correct resistance value.
Q: Can I use standard automotive wiring for an oil pressure gauge installation?
A: While standard automotive wiring can be used, it's crucial to select wire of the appropriate gauge (18-22 AWG is typical) and ensure it's oil-resistant. Using high-quality, shielded wire is recommended to minimize electrical interference and ensure long-term reliability, particularly in harsh engine environments.
Conclusion
Correctly wiring an oil pressure gauge is critical for ensuring accurate engine monitoring and preventing potentially catastrophic failures. This guide has detailed the material science, manufacturing considerations, performance engineering, and common troubleshooting steps involved in a successful installation. Understanding the nuances of signal transmission, grounding, and environmental resistance are paramount for achieving reliable and long-lasting performance.
Proactive maintenance, including regular inspection of wiring and connections, and periodic calibration of the gauge, will further enhance system longevity and accuracy. Adhering to industry standards and best practices, as outlined in this document, is essential for professionals involved in automotive and industrial instrumentation. Future advancements may focus on wireless sensor technologies and self-calibrating gauges to further streamline installation and improve data accuracy.